Boomea allows users to schedule one-time or recurring meetings.
Scheduling a Meeting
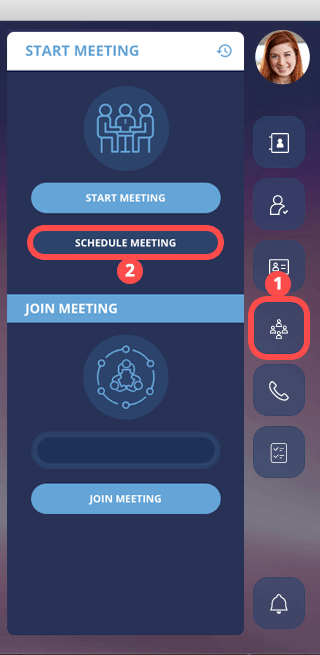
- Click on the Boomea Meeting icon on the right side of the application.
- Click on the Schedule Meeting button.
Scheduled Meeting Options:
There are many options you can set when scheduling a meeting.
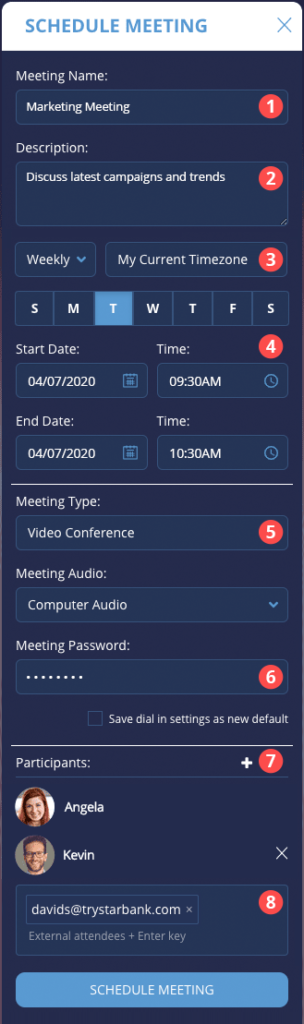
- Type a name for your meeting.
- Type an optional description for your meeting.
- Set the frequency of the meeting:
- Once: The meeting will only occur one time. Once the meeting has been ended, it will automatically be removed from your scheduled meeting list.
- Daily: The meeting will recur each day.
- Weekly: The meeting will recur each week. When this option is selected, you are shown days of the week to select. This is so you can select “Monday and Friday of every week”.
- Monthly: The meeting will recur each month on the date selected.
- Yearly: The meeting will recur each year on the date selected.
- Set the start and end time of your meeting.
- Set the meeting type (learn more about meeting types).
- You have the option to password protect the meeting.
- Click the plus icon (+) to invite participants from your account.
- Type in external email addresses to invite outside guests to your meeting.
(Make sure to type the ENTER key after typing each address)
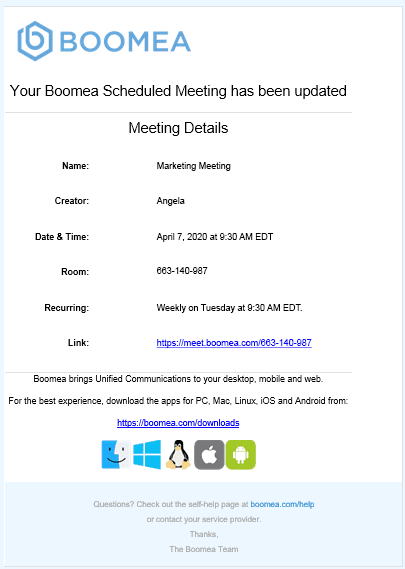
Click the Schedule Meeting button and Boomea will send out an email to all the participants with the meeting information and a meeting invite that the participant can add to their calendar.
Viewing a Scheduled Meeting
To view a list of your scheduled meetings, click the calendar icon located in the header of the Boomea Meeting sidebar.
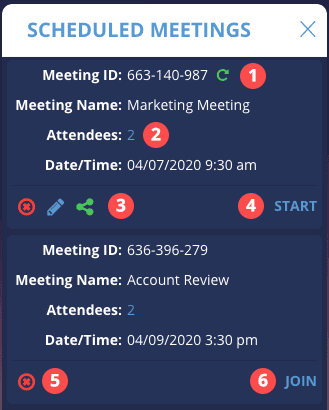
- Recurring icon: This icon indicates that the meeting will repeat. To learn how frequently the meeting will repeat, you can click on the icon.
- Number of attendees: To view the participants, you may click on the numeral.
- Action Items: (From left to right)
- Delete: This icon allows the meeting creator to delete the meeting. All attendees will receive an email indicating that the meeting has been canceled, and they will also receive a calendar event update that will remove the event from their calendar.
- Edit: This icon allows the meeting creator to edit the meeting.
- Share: This icon, when clicked, will copy the join meeting link to the user’s clipboard
- Start Button: If you’ve created this scheduled meeting, you can click the START button to begin the meeting.
- Remove Yourself From Meeting: If you are a participant in a meeting, you can remove yourself from the meeting by clicking the X icon.
- Join Button: If you are a participant in a meeting, you will see the JOIN button. When clicked, you can join the scheduled meeting. Please note, the meeting cannot be joined until the meeting creator starts the meeting.
Editing a Scheduled Meeting
The edit scheduled meeting page is like the add scheduled meeting page. The creator can edit the name, recurrence, date/time, and participants. When a meeting is edited, all the participants will receive an email indicating that the meeting has been edited, and a calendar invite that will update the event in their calendar.
- Click on the calendar icon in the Meetings header to view your scheduled meetings.
- Click the edit icon within the meeting you wish to edit.
